本文共 6355 字,大约阅读时间需要 21 分钟。
参考了。但是原教程中直接在Activity的onCreate()函数中发出Intent请求GitHub服务器发送回authorization code,导致这个实例容易产生自动重复调用并陷入死循环直至GitHub给出拒绝访问的错误。我简单把发送Intent做成了一个按钮的回调,这样这个实例就更容易使用了。
原教程是利用GitHub提供的OAuth2接口进行的调试,所以首先需要注册好GitHub账户,这里我单独注册了一个新的GitHub账户。为了能够正常进行调试,首先需要在GitHub服务器上注册自己的Android App。
在GitHub上注册自己的App
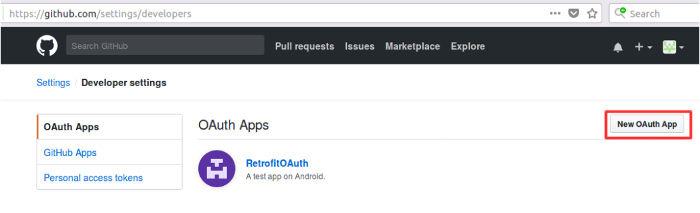
首先登录自己的GitHub网页,进入Settings页面,在页面的左下,点击 “ Developer settings ”。

由于我已经注册好所需要的App,所以页面如下所示。点击“New OAuth App”按钮。
填写好Application name,Homepage URL,Application description,和Authorization callback URL。其中callback URL我填写成huyaoyu://callback。添加好App后,将看到如下画面。
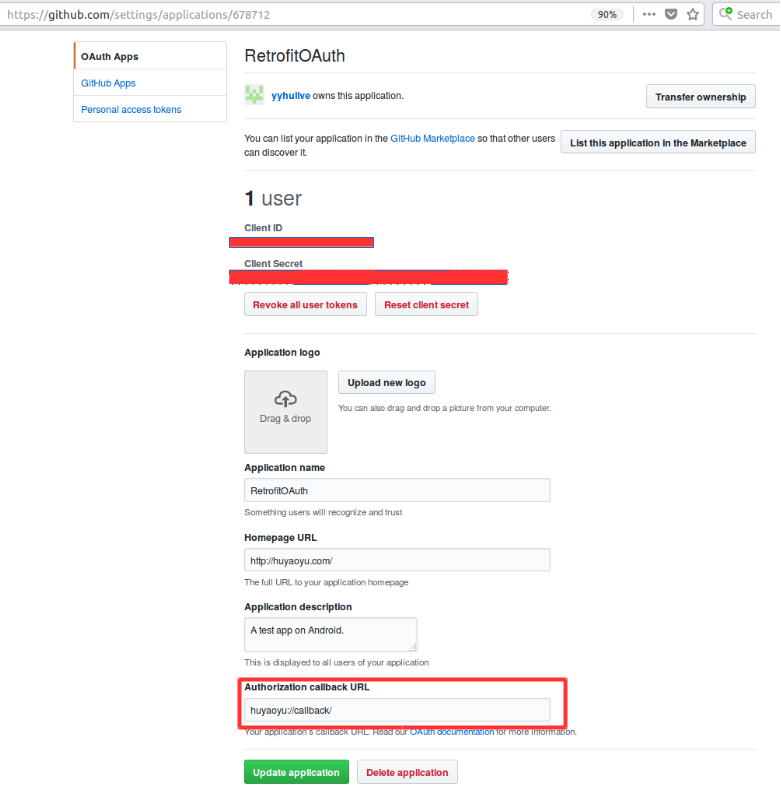
上图中,需要记下GitHut生成的client ID,client secret。
业务逻辑
本实例使用如下的逻辑过程与GitHub进行交互。
(1)点击Android App的按钮,想GitHub服务器提供client ID和callback uri。
(2)首次GitHub授权,或者连续多次请求GitHub授权后GitHub服务器认为请求过多时,在浏览器中显示GitHub的授权页面。
(3)获得授权回到Android App的Activity中,从GitHub的response中获取authorization code。利用该authorization code,配合client ID和client secret向GitHub服务器请求access token。
(4)请求成功时显示access token到Layout上的一个TextView中,并同时以Toast形式显示。
接下来即可设计Android程序。
Android App
Emulator
本实例使用的虚拟机为API Level 24,也就是Android 7.0,并带有Play Store。虚拟机中预装了Chrome,将Chrome更新到最新版。
添加依赖项
为了正确使用Retrofit,需要在app的dependencies里添加retrofit的依赖。以下依赖项已经省略了其他依赖项的罗列。
dependencies { compile 'com.squareup.retrofit2:retrofit:2.3.0' compile 'com.squareup.retrofit2:converter-gson:2.3.0'} 设计Layout
这里我们设计有一个按钮,并留下一个空的TextView。
设计AccessToken类
设计一个AccessToken类,用于表达一个access token并为Retrofit所用。
package com.huyaoyu.retrofitoauth;import com.google.gson.annotations.SerializedName;/** * Created by yaoyu on 3/3/18. */class AccessToken { @SerializedName("access_token") private String accessToken; @SerializedName("token_type") private String tokenType; public String getAccessToken() { return accessToken; } public String getTokenType() { return tokenType; }} 设计Retrofit client
设计一个interface,返回一个Retrofit Call对象。
package com.huyaoyu.retrofitoauth;import retrofit2.Call;import retrofit2.http.Field;import retrofit2.http.FormUrlEncoded;import retrofit2.http.Headers;import retrofit2.http.POST;/** * Created by yaoyu on 3/2/18. */public interface GitHubClient { @Headers("Accept: application/json") @POST("login/oauth/access_token") @FormUrlEncoded Call getAccessToken( @Field("client_id") String clientID, @Field("client_secret") String clientSecret, @Field("code") String code );} MainActivity
当用户点击“GET ACCESS TOKEN”按钮后,MainActivity完成了两件事。首先通过发出一个Intent来GET一个GitHub的专用页面,请求的URL为
https://github.com/login/oauth/authorize?client_id=YourClientID&scope=repo&redirect_uri=huyaoyu://callback
其中scope参数是GitHub的一个可选参数,这里表示只要获取访问repo的权限。第二个事情是当用户授权后或者之前已经授权了,App会捕捉到GitHub对huyaoyu://callback的请求,在这个请求下,获取GitHub返回的authorization code。这个authorization code是包含在了response的body中,并通过Retrofit转换为了JAVA class。利用获取到的authorization code加上client ID和client secret,立即向GitHub服务器请求access token。当成功获得access token后,通过textView和Toast显示出来。
package com.huyaoyu.retrofitoauth;import android.content.Intent;import android.content.pm.PackageManager;import android.net.Uri;import android.os.Environment;import android.support.annotation.NonNull;import android.support.v7.app.AppCompatActivity;import android.os.Bundle;import android.view.View;import android.widget.ListView;import android.widget.TextView;import android.widget.Toast;import java.io.File;import retrofit2.Call;import retrofit2.Callback;import retrofit2.Response;import retrofit2.Retrofit;import retrofit2.converter.gson.GsonConverterFactory;public class MainActivity extends AppCompatActivity { private ListView listView; private String clientId = "your client ID"; private String clientSecret = "your client secret"; private String redirectUri = "huyaoyu://callback"; @Override protected void onCreate(Bundle savedInstanceState) { super.onCreate(savedInstanceState); setContentView(R.layout.activity_main); } @Override protected void onResume() { super.onResume(); Uri uri = getIntent().getData(); if ( uri != null && uri.toString().startsWith(redirectUri)) { String code = uri.getQueryParameter("code"); Retrofit.Builder builder = new Retrofit.Builder() .baseUrl("https://github.com/") .addConverterFactory(GsonConverterFactory.create()); Retrofit retrofit = builder.build(); GitHubClient client = retrofit.create(GitHubClient.class); Call accessTokenCall = client.getAccessToken(clientId, clientSecret, code); accessTokenCall.enqueue(new Callback () { @Override public void onResponse(Call call, Response response) { String accessToken = response.body().getAccessToken(); TextView textView = findViewById(R.id.textView); textView.setText("Access token: " + accessToken); Toast.makeText(MainActivity.this, "access_token: " + accessToken, Toast.LENGTH_SHORT ).show(); } @Override public void onFailure(Call call, Throwable t) { Toast.makeText(MainActivity.this, "No!", Toast.LENGTH_SHORT).show(); } }); Toast.makeText(MainActivity.this, "Yeah!", Toast.LENGTH_SHORT).show(); } else { Toast.makeText(MainActivity.this, "Null!", Toast.LENGTH_SHORT).show(); } } public void onClickGetAccessToken(View view) { Intent intent = new Intent(Intent.ACTION_VIEW, Uri.parse( "https://github.com/login/oauth/authorize" + "?client_id=" + clientId + "&scope=repo" + "&redirect_uri=" + redirectUri )); startActivity(intent); }} 修改Manifest
增加App的Internet访问权限,并增加一个<intent-filter>用于捕获GitHub返回的huyaoyu://callback uri。
实际调试
实际调试情况如下图。首次运行时,会弹出浏览器,用户需要登录GitHub账户,并根据页面信息选择授权。之后再次调试程序时就不会在需要用户登录和授权了,但是会闪现一下浏览器的画面。实际开发时,应当是判断当前的access token的持有情况,若不需要重新申请授权,则不应该发出启动浏览器的intent。
